Disassembling
Add Disassembling
In the Manufacturing menu, select Disassembling.
- Click “+Add Disassembling”
- Click Type to search assembly product and select the product you’re creating a Disassembling for.
- Click Save and Continue Edit to save the Disassembling as a draft, or click Save and Approve to approve or click Save and Pending to mark the Disassembling as pending and enter a new Disassembling or click Save and New to record a new Disassembling and save the previous one or click Save and Close to close the Disassembling and save the Disassembling in draft status.
Disassembling fields and description
- Product to Disassemble: Enter the name of the product you would like to create a Disassembling for.
- Date, due date: This is set as default to the current date. You can change this also.
- Number: Use Splendid Accounts default numbering sequence or you can add your number sequence by clicking on number code and then a “+ “sign
- Reference: Choose a reference to suit your company. Later, you may want to search for your Disassembling using your chosen reference.
- Master Group: This field appears only if you have enabled Groups. Groups let you customize the Disassembling in many ways.
- Quantity to Disassemble: Enter the output quantity you want to discard for a product.
- Detail Group A: This field appears only if you have enabled Groups. Groups let you customize the Disassembling in many ways.
- Detail Group B: This field appears only if you have enabled Groups. Groups let you customize the Disassembling in many ways.
Disassembling line fields and Description
- Product: Select products if you have inventory products set up for your organization. Inventory products speed up data entry by automatically filling in the product field with information you’ve saved against your inventory products.
- Product Description: Enter text as you’d like to describe the products. You can include description lines in your product’s short description that will automatically display at line item.
- Warehouse: Select the warehouse in which the inventory will be managed. The default warehouse will be displayed in Disassembling form if you set the warehouse as default in the warehouse section. If there is only one warehouse, no dropdown will be available as all the inventory will be managed in that warehouse.
- Batch: This field will represent a batch number for the products
- Quantity: Enter the number of products.
- Cost: This will represent the average cost of a product managed in inventory.
- Amount: This is the calculated amount of a product.
- Consignment: Add a consignment number to record from against which consignment has been received. The consignment will display if you have enabled tracking the consignment from company settings.
Account Expenses (Optional):
This is an optional field to record your expenses such as delivery charges or shipping charges.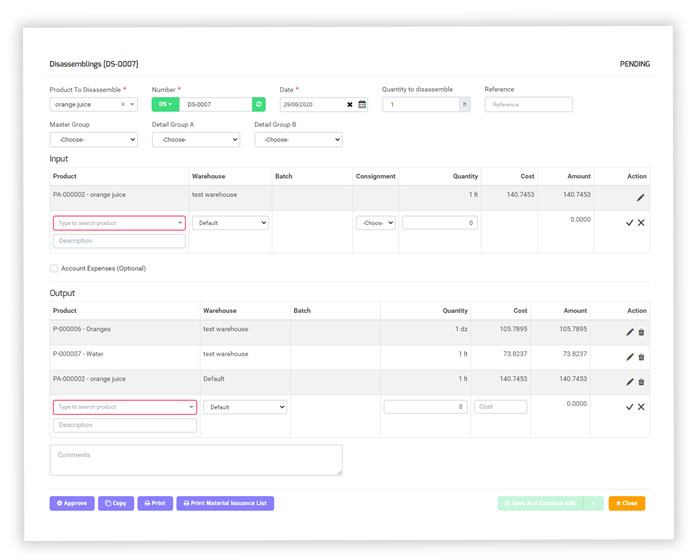
Manufacturing Setting
Splendid Accounts allow you to manage settings for input and output quantity at assembling or disassembling. These settings can be done in company setting